Diet Coke + Mentos Bellagio Fountains
The mad scientists at EepyBird.com have a fabulous live video of their Mint-powered Bellagio Fountains. (By way of Aileen.)
Diet Coke + Mentos Bellagio Fountains Read More »
The mad scientists at EepyBird.com have a fabulous live video of their Mint-powered Bellagio Fountains. (By way of Aileen.)
Diet Coke + Mentos Bellagio Fountains Read More »
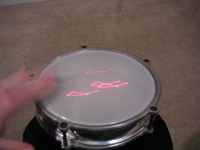
My latest project: attach laser pointers to my dumbek drum so I get a mini-lightshow shinging on the drum head every beat. Total cost (with the exception of the dumbek) was about $5.
Drums with frickin’ laser beams attached to their heads Read More »
There’s a lot of great stuff at the Maker Faire (no doubt one of the more photoblogged events of the month), but one of the things I liked the most was this cute little “micro rhythm orchestra” by Jonathan Foote. [Quicktime, 520K]
Tags: makerfaire, makerfaire2006
Micro Rhythm Orchestra Read More »
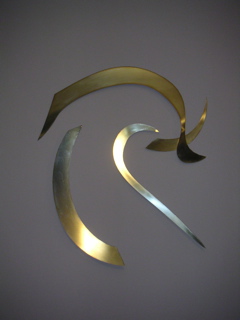
Shortly after I moved into my new house I was thinking about artwork for my walls and all of a sudden I had a vision of a sort of Van Goghesque fireball made out of brass or bronze as a wall hanging. It’s been a long time coming, but I finally finished the piece a couple months ago. And since a project is never truly done until you’ve posted a do-it-yourself guide on the Web, I’ve just finished a summary and pictures of the project as well as a project page at instructables.com.
DIY: How to make a brass “Fireball” hanging wall sculpture Read More »
From The Onion:
MIT Fraternity Accused Of Robot Hazing
CAMBRIDGE, MA—Several members of the Massachusetts Institute of Technology chapter of the Theta Tau fraternity are in campus-police custody today following a brutal hazing incident in which one robot remains missing and two others are in critical condition with extensive circuitry and servo-motor injuries, sources revealed Monday.
…
In protest, human-emotion-simulator robot Kismet, a respected member of the MIT community, announced that it will only display an expression of disapproval—refusing to smile, show fear, or raise a curious eyebrow—until those responsible receive appropriate punishment.
(Thanks to Jofish for the link!)
For the record, I’d like to say that yesterday’s FoxTrot comic was especially cruel to those of us who just don’t know when to leave well enough alone and go to sleep.
I’m just saying…
 |
 |
FoxTrot unfair to the compulsive Read More »

Almost exactly 20 years ago, Students from Harvey Mudd College pulled one over on their rival Caltech by relocating a Spanish-American War cannon from Caltech’s Fleming House to their own campus. Now the cannon has a new home: MIT hackers posing as the Howe & Ser Moving Company have relocated the cannon to the Massachusetts Institute of Technology campus in Cambridge, MA. The cannon now also sports a giant gold-plated Brass Rat, the MIT class ring. A plaque dedicating the cannon notes that “In honor of its previous owners, the cannon points towards Pasadena, CA.”
Caltech cannon upgrades to better tech school Read More »

Philip Lenssen at Google Blogscoped has a great little webform that lets you whack out seemingly-authoritative statistics-laden webpages like this one, just like the big boys do!
Custom stats at your fingertips Read More »
On March 29, 2006 there will be a total solar eclipse, which is when the moon moves directly between the sun and the Earth. It won’t be visible here in the U.S., but even if you don’t live in Brazil, North Africa, Turkey or East Asia you can join in the fun! The San Francisco Exploratorium is hosting a big eclipse party starting at 9pm Pacific time, and they’ll be hosting a webcast of the eclipse live from a Roman amphitheater in Turkey.
The most important thing to remember when viewing an eclipse is never view an eclipse with the naked eye, binoculars or a telescope! That’s because the sun will fry your eyeballs like a grape in the microwave. So to enjoy next week’s eclipse webcast safely, just follow these simple instructions to build a pinhole eclipse webcast viewer.
Build your own Eclipse Webcast Viewer Read More »
Lately I’ve been experimenting with making hardened-leather face-masks. I’m making a bunch of butterfly-looking ones to adorn my wall, but with Mardi Gras just around the corner I figure people might enjoy a quick DIY guide:
 |
Start with vegetable-tanned (also known as saddle-skirt) leather. I picked mine up at a local Tandy Leather. Update 2/25/06: Get 5/7-weight leather (that is, between 5/64″ and 7/64″ thick). Thicker is OK, though you’ll get more shrinkage (less soak-time may help that). Thinner won’t harden as quickly, will be brittle and won’t hold a shape very well. |
||||
 |
Cut a mask pattern, allowing for about 30% shrinkage. | ||||
 |
Soak leather in cool water for 10 minutes. | ||||
 |
Heat water to 180°F. | ||||
|
Soak in hot water for around 90 seconds. The leather will shrink, curl and thicken, and then start to uncurl. The longer you soak it the stretchier it will be at the start and the smaller, harder, thicker and more brittle the end result will be. | ||||
 |
Once the leather comes out, you have about 5 minutes to stretch and shape it before it becomes stiff. For a good face-shape be sure to add bumps for the bridge of the nose, eyebrows and cheekbones. If you have any dangly bits they can be twisted or braided, and they will harden into whatever shape you set them. Over the next 10 minutes, give it a pinch every now and then to make sure it stays in the shape you want, then let it dry overnight. By morning, it should be hard as wood. | ||||
  |
If you decide now that you need to expand the eyeholes or change the outline you can use a drill or saw. Otherwise, you’re ready to paint it, using a paint suitable for leather. I used several coats of “3D” fabric paint. Mardi Gras colors are green, purple and gold. Add ribbon-ties if you like. Have fun! |
Update 2/25/06: More masks I’ve been making:


This guide can also be found on instructables.com.
DIY Mardi Gras masks Read More »


