[other traps]
Multishot Pellet-Gun Trap
Multishot Pellet-Gun Trap
| Type | Dart, hinged-lid box |
|---|
| Disarm level | 3 (easy) |
|---|
| Sensitivity | 1 (shippable) |
|---|
| Reset time | 1-2 minutes |
|---|
| Construction level | 7 (complex) |
|---|
| Designer | Bug |
|---|
| Date | Christmas, 2005 |
|---|
This is a rather nice "dart" style trap that sprays multiple
pellets in a wide arc. In theory this design could shoot up to 35
darts in all directions except for a 45-degree shadow directly
behind the box lid, but my first version just shoots 10 pellets in
the front 125-degree arc. Each one will shoot anywhere from 10-20
feet.
I usually focus on making it difficult to find and disarm a simple
explosive-cap trap, but this year I wanted to change things up a bit and
focus on the effect itself. In particular, I wanted to make a box trap that
would shoot darts out in all directions, machine-gun style. It had to be
completely mechanical (what can I say, I like the style better), and had to
be stable enough to ship through the mail without going off or getting
jammed. After many failed attempts at designing a mechanical rotary
slug-thrower (modeled after the Portable Electromechanical Slug
Thrower) I landed on this rather elegant sprung-hammer design.
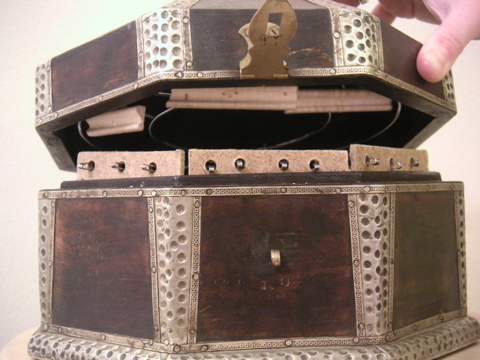
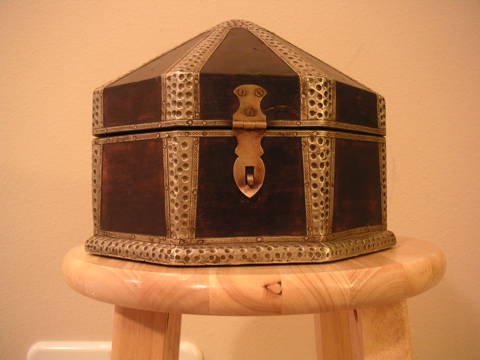
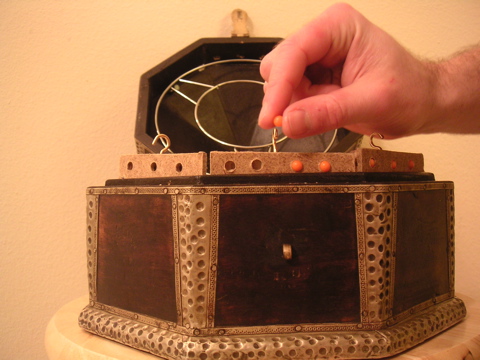
The trap is designed around an octagonal wooden box with a deep hinged
lid (purchased on sale from Pier
One). I mostly built my own scaffolding and left the box unmarred, but
as you'll see below I did need to make a few nail holes in the lid. Each
pellet is propelled by a dedicated spring-steel "hammer" that is poised
behind the pellet's firing hole. When the trap is set, the hammers are held
back by three wooden barriers. As the lid is closed, these barriers hook
onto a metal ring around the inside of the lid. The next time the lid is
lifted, the barriers go with it and allow the hammers to spring back to
their original position, thus whacking the pellets out of their holes.
Warning: This trap fires small pellets and
should only be disarmed or opened by people wearing eye protection. This
kind of trap should not be left unsupervised while armed.
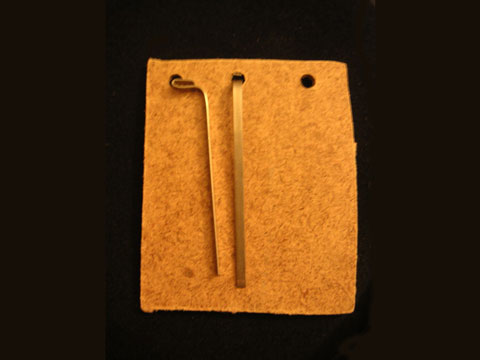
Equipment
- 1 Box with deep lid
- 3 wooden tiles, sized to peek about 1cm above the lip of the box when
placed just inside the wall.
- 10 hammers twisted from spring steel and cut about 2cm shorter than
your wood tiles. I got my spring steel from my recently-replaced windshield
wipers, but you can also salvage some from an old leaf rake or in some
areas find it in the streets after it's broken off of street-sweeper
bristles.
- 3 thin wooden barriers, with hooks screwed into their tops. I used
shaped moulding from the hardware store, which had the added benefit of
being slightly angled.
- Metal ring that fits fairly exactly inside the box lid. I got lucky here
and found a $3 metal trivet base at my local Chinese grocery, but I'm sure
you can find something else to do the same job.
- Thick (about 2cm) octagonal wooden board, cut to fit snugly on the floor of the box
after tiles are screwed into the sides.
- 10 small plastic spheres to act as darts. I used 6mm Soft Air Ammo that
I found at Wal*Mart.
| Equipment |
|---|
Box |
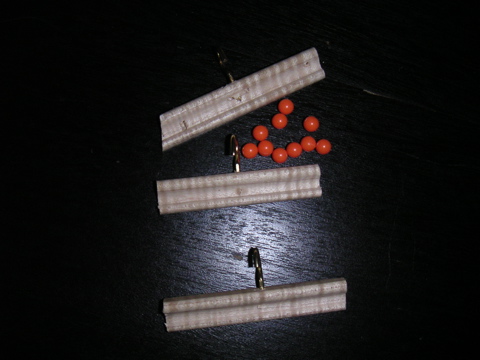
Barriers and pellets |

Steel ring in lid |
Tiles and hammers |
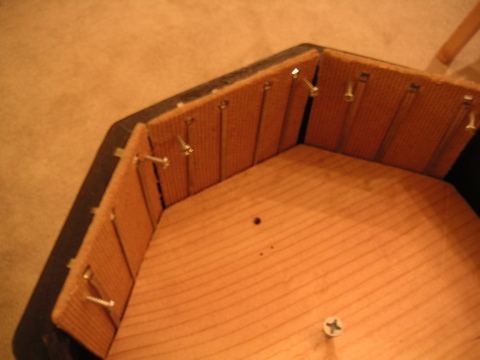
Construction
Parts: Most of the construction time is spent making the various
pieces. Cut the board that will form your "floor" into an octagon, slightly
smaller than the floor of the box itself. You'll want it to fit snugly into
the box after you screw the tiles onto the sides. Cut the wooden tiles such
that they just peak over the lip of the box, and bend and cut your
spring-steel into hammers slightly shorter than the tiles. Drill three or
four firing holes in the tops of each of the tiles. The holes should be
slightly smaller than the diameter of your ammo, such that the
pellets stay in place but can be knocked out. You'll want to experiment
with hole diameter first, as it depends a little on the type of wood you
use for the tiles. Then put two small screws into each tile, positioned
just below and to the left and right of each row of holes. These screws
will keep the barrier from being pushed down past the hole-line when the
lid is closed. Cut the barriers such that they cover a complete row of
holes along a tile. They should be long enough to sit on the two small
screws you just put in. Screw a hook into the top of each
barrier. Depending on the shape of your barrier, you might want the hook to
angle slightly back (away from the hook part).
Tiles & hammers: Place the hammers such that their heads
stick through the holes, then screw the tile to the edge of the floor
board, with the hammers on the inside of the box peeking out through the
hole. The base of the hammers should be sandwiched between the floor board
and the tiles, such that they spring back when plucked. When they're all
attached, place the floor board into the box. If necessary, shim the board
so it doesn't move around, or just screw it into the box bottom itself.
Lid of box |
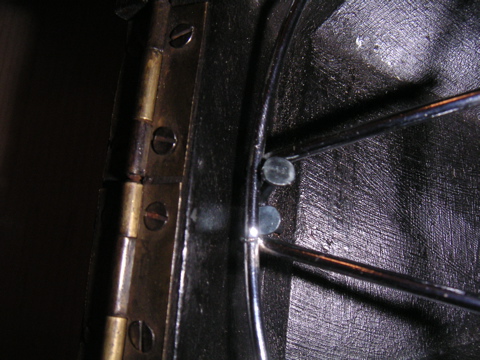
Ring nailed into the lid |
Lid: Place the steel ring into the lid such that it fits snugly,
and fasten it in place. I just used straight nails pounded at an angle, but
double-headed nails or screws would work better if you can find a good
angle to drive them in.
You may have to adjust the angle of the hooks in the barriers, the
position of the tiles or the position of the steel ring slightly to get the
trap to arm properly (see below). Experiment until the hooks catch smoothly
every time.
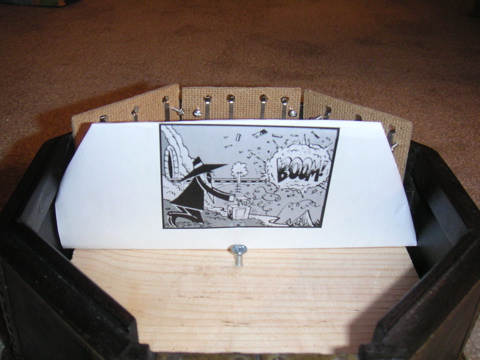
Arming
Assuming everything is aligned well in the construction, arming the trap
is simple:
For each tile, pull its hammers back and place a wooden barrier
between the hammer and the hole, with the hook facing out. The
barrier should rest on the small screws on either side of the row of holes
and should be held in place by the tension of the hammers. Make sure that
each hammer is still directly behind its hole.
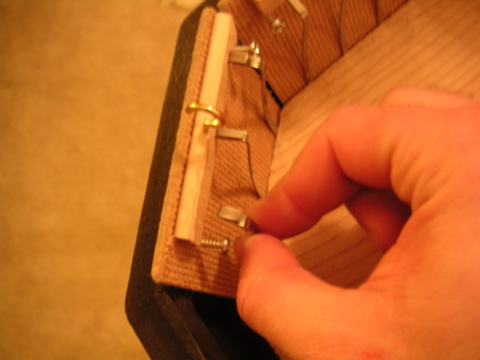
Placing each barrier |
Loading |
Stuff each hole with a pellet.
Carefully close the lid. The ring should come in contact with the hooks,
such that if the hooks were solidly held in place they would block the lid
from closing completely. However, since the hooks are only held by the
tension of the hammers (and since they're resting on the small hooks and
can't be pressed down any further) the ring will push each hook towards the
inside of the box. As the lid continues to close, you should hear a click
as each hook snaps into place over the ring.
This is the step where you find out if everything is properly
aligned, and you may need to change either the angle of the hooks in your
barriers or the position of your tiles and/or ring to make everything work
smoothly.
Firing
When you open the lid, the hooks all catch on the ring and are pulled up
with the lid. When they clear the holes, the hammers fire and shoot the
pellets out in all directions.
Disarming
Since this is a dart-style trap, the easy way to "disarm" it is to just
open it from the back (that's what Jay did). It's also possible to open the
lid just enough to access the ammo and then (in theory) pull each pellet
out with tweezers, though that can be tough for pellets that are deep in
their holes. Another friend of mine managed to stick a coat-hanger wire in
through a crack near the back hinge and knock several hammers out of
alignment enough that they wouldn't fire. He didn't manage to get all of
them and the hammers have enough force that they'll work even if they
aren't perfectly straight, but Jay and I agree it was a heroic effort all
the same.
Of course, your intrepid trap-disarmer needs to recognize that he's
dealing with a dart trap first. The pellets in my version are pretty
obvious, and anyone who has experienced a dart trap before will recognize
it as such, but I can imagine designs where the pellets are disguised in
some way or made to look like ornamental parts of the box. There are also
cracks on either side of the hinge that are wide enough to see through one
while shining a flashlight through the other — giving the person
disarming the trap a clear view of the hammer mechanism. Since I didn't
think Jay needed any help, I inserted a piece of paper so he'd see a
different view.